
 One of the things that make a smartphone smart is its ability to detect movement, orientation and aspects of its environment (temperature or humidity).
Tilt it, twist it or shake it and a smartphone app can possibly detect the movement and display application appropriate responses. What that is exactly will vary, of course, from app to app. A game may use tilt to change the flow of a ball, or a drawing application may use a shake to clear the current screen, a bit like Etch-a-Sketch… The ball is in the developer’s court, as it were, to make the most of the smartphone and its operation in any given environment
How is all this done? By in-built sensor management, and for Android this means the Sensor Manager. It manages the various sensor readings and in turn makes them available for use by developers in their apps.
Overview
There are three broad categories of sensors supported by the Android platform: motion, environmental, and position sensors
Motion sensors – accelerometers, gravity sensors, gyroscopes, and rotational vector sensors – measure acceleration forces and rotational forces along three axes.
Environmental sensors – including barometers, photometers, and thermometers – measure environmental aspects such as ambient temperature and pressure, illumination, and humidity.
Position sensors – including includes orientation sensors and magnetometers – determine the “physical position” of a device.
Of course, one of the first things you should do is check for these system elements, such as an accelerometer, at app start-up. You need to be sure you will be able to process sensor events. You’ve got to know what exactly is available to you on any given device. Google writes:
Few Android-powered devices have every type of sensor. For example, most handset devices and tablets have an accelerometer and a magnetometer, but fewer devices have barometers or thermometers. Also, a device can have more than one sensor of a given type. For example, a device can have two gravity sensors, each one having a different range.
Also, they say:
Android does not specify a standard sensor configuration for devices, which means device manufacturers can incorporate any sensor configuration that they want into their Android-powered devices. As a result, devices can include a variety of sensors in a wide range of configurations. For example, the Motorola Xoom has a pressure sensor, but the Samsung Nexus S does not. Likewise, the Xoom and Nexus S have gyroscopes, but the HTC Nexus One does not. If your application relies on a specific type of sensor, you have to ensure that the sensor is present on a device so your app can run successfully.
Android sensor framework
Helping you to acquire and make sense of raw sensor data is something called the Android sensor framework, providing classes and interfaces to work with the sensor manager. Google says you can use the sensor framework to do the following:
- Determine which sensors are available on a device.
- Determine an individual sensor’s capabilities, such as its maximum range, manufacturer, power requirements, and resolution.
- Acquire raw sensor data and define the minimum rate at which you acquire sensor data.
- Register and unregister sensor event listeners that monitor sensor changes.
Note that the framework accesses sensors that are both hardware and software-based:
Hardware-based sensors are physical components built into a handset or tablet device. They derive their data by directly measuring specific environmental properties, such as acceleration, geomagnetic field strength, or angular change. Software-based sensors are not physical devices, although they mimic hardware-based sensors. Software-based sensors derive their data from one or more of the hardware-based sensors and are sometimes called virtual sensors or synthetic sensors. The linear acceleration sensor and the gravity sensor are examples of software-based sensors.
Also, there is no direct way to determine the rate at which the sensor framework is sending sensor events to your app. There are, however, timestamps associated with each event, enabling you to calculate the sampling rate over multiple events.
A view from the code
For a coding perspective of the Sensor Manger check out http://developer.android.com/reference/android/hardware/SensorManager. This shows you how to access a device’s sensors via an instance of the class SensorActivity, which is created by calling Context.getSystemService() with the argument SENSOR_SERVICE.
A whole variety of evocative pre-declared constants are available for use, such as:
float GRAVITY_EARTH Earth’s gravity in SI units (m/s^2)
float GRAVITY_MARS Mars’ gravity in SI units (m/s^2)
float LIGHT_SHADE luminance in shade in lux
float LIGHT_SUNLIGHT luminance of sunlight in lux
float PRESSURE_STANDARD_ATMOSPHERE Standard atmosphere, or average sea-level pressure in hPa (millibar)
And there are different constants for accessing the different sensors on a smartphone:
int Sensor.TYPE_GYROSCOPE
int Sensor.TYPE_MAGNETIC_FIELD
int Sensor.TYPE_ORIENTATION
int Sensor.TYPE_ACCELEROMETER
And public methods of the class – functions you can call on your particular instance of SensorActivity – include:
static void getAngleChange(float[] angleChange, float[] R, float[] prevR)
Helper function to compute the angle change between two rotation matrices.
static float getInclination(float[] I)
Computes the geomagnetic inclination angle in radians from the inclination matrix I returned by getRotationMatrix(float[], float[], float[], float[]).
static float[] getOrientation(float[] R, float[] values)
Computes the device’s orientation based on the rotation matrix.
Monitoring Sensor Events
Two things to cover are callback methods, via the SensorEventListener interface. If a sensor’s accuracy changes the onAccuracyChanged() method will be called. If a sensor reports a new value then the onSensorChanged() method will be called, providing you with a SensorEvent object.
Note there is a whole range of best-practice advice to follow – unregister sensor listeners when you are done, verify sensors before you use them, choose sensor delays carefully, don’t block the onSensorChanged() method…
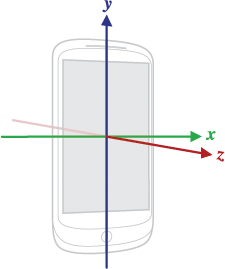
And you must be careful about how you interpret the data (obviously), especially when it comes to changing co-ordinates. Google writes:
The most important point to understand about this coordinate system is that the axes are not swapped when the device’s screen orientation changes – that is, the sensor’s coordinate system never changes as the device moves. This behaviour is the same as the behaviour of the OpenGL coordinate system.
Another point to understand is that your application must not assume that a device’s natural (default) orientation is portrait. The natural orientation for many tablet devices is landscape. And the sensor coordinate system is always based on the natural orientation of a device.
The range of sensing
Here is a definitive list of sensor types supported by Android, up to Jelly Bean II aka 4.2. Note that some sensor types are depreciated and are not used by the latest Android versions – always check the current documentation.
- Accelerometer
- Ambient temperature
- Gravity
- Gyroscope
- Light
- Linear acceleration
- Magnetic field
- Orientation
- Pressure
- Proximity
- Relative humidity
- Rotation vector
- Temperature
Android 4.4 “KitKat”
Note that Android 4.4 “KitKat”, in November 2013, saw the introduction of two new composite sensors: a step detector and a step counter. Google wrote at the time:
The step detector analyzes accelerometer input to recognize when the user has taken a step, then triggers an event with each step. The step counter tracks the total number of steps since the last device reboot and triggers an event with each change in the step count. Because the logic and sensor management is built into the platform and underlying hardware, you don’t need to maintain your own detection algorithms in your app.
Step detector and counter sensors are available on Nexus 5, and we’re working with our chipset partners to bring them to new devices as soon as possible.
KitKat also saw the introduction of Sensor Batching, where Google added a new, more efficient, approach to monitoring ongoing sensor activities.
With sensor batching, Android works with the device hardware to collect and deliver sensor events efficiently in batches, rather than individually as they are detected. This lets the device’s application processor remain in a low-power idle state until batches are delivered. You can request batched events from any sensor using a standard event listener, and you can control the interval at which you receive batches. You can also request immediate delivery of events between batch cycles.
It was designed to make apps more efficient and lets developers track sensor events continuously even if the system is asleep. It is aimed at low-power, long-running use-cases such as fitness monitoring and location tracking.
Again, Sensor Batching was first made available on the LG Nexus 5.
Practical example
An excellent looking tutorial on using the Sensor Manager can be found at java.dzone.com – See Sensor Management in Android, Mr Brown Can Moo. Walter Bogaardt writes an app where a sound is made when the device is tilted (based on the “Cow in a can” toy).
There is also Lars Vogel’s Android Sensor tutorial, and – on YouTube – Android Application Development Tutorial 126 – Setting up Sensor Manager.


Hello,
I have given my blog link for Sensor manager code that is changed now with new description and link.. and there is no option for edit previous comment so use this link now: http://www.coders-hub.com/2013/10/how-to-use-sensor-in-android.html
Thanks Mohsin, and Android Example
Nice article…with different types of sensor.
Here is Sensor Manager code example: http://innosen.blogspot.in/2013/10/how-to-use-sensor-in-android.html
Very nice dude…
I have also found one good link here….
Accelerometer Basic Example – Detect Phone Shake Motion